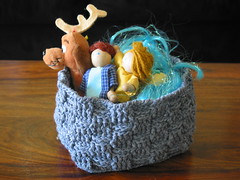
Lunchbag
I've only begun mine, so hang in there while I finish with the basic plan.
I saw this idea on twelve 22 and thought it was nice. Personally, a more square or rectangular bag would be more useful -possibly fit more items inside, certainly take less shelf space side-to-side. As a homeschooler, these lunch bags would be wonderful for our field trips!
Materials:
yarn and hook or needles (I used Aunt Lydia's Denim and a G hook for a dense material)
measuring tape
fabric
sewing machine or needles (this is pretty quick to sew) and thread
large button
My version is crocheted, but a knit version would be easy to make.
Note: this is written in American crochet.
Crochet in multiple of 8+1 to desired length.. (I worked 25ch)
turn, sc in second ch from hook and each across, ch1 turn.
*sc in each sc, ch 1 turn. Repeat from * until 2 less than a multiple of 8. (22 rows on my bag)
sc across, do not turn.
First Round:
sc in edge st of each row,
sc across bottom of beginning ch,
sc in each st of remaining edge.
sc across top of sc to beginning of round, join with sl st, ch 1.
(this will put 2 sts in the corner sts, because there is one from the 'edge' and one from the loops at top or bottom which gave me 24 st on each side..). You should end up with (or fiddle slightly as you stitch) a multiple of 8 on each edge (mine had 24 per side, 96 sts total)
You can measure the size of the base now (if your tape measure is handy) or when you've finished the basket.
In back loops only (this round only): hdc in each st around, join w/sl st, ch1.
Basketweave pattern:
first 2 rounds of pattern: (fpdc around next 4 sts, bpdc around next 4 sts) around, join w/sl st, ch1.
next 2 rows of pattern: ( bpdc around next 4 sts, fpdc around next 4 sts) around, join w/sl st, ch1.
Repeat all 4 rows of basketweave pattern to desired height (I repeated twice).
Final Round (work in both loops except center 4 sts on each side, )
Crab st in last 10 sts of previous round. *Crab st in Front Loop Only next 4 sts, crab sts in next 20 sts. Repeat from * twice, Crab st in remaining 10 sts. Fasten off, weave in ends.
How tall do you want the lunchbag? Measure how tall the side of the basket is at this point. The last crochet part is to make handles from the unused loops on the last round. The 2 options are:
A) Work the strips long enough to go over the top of the bag and connect on the opposite or adjoining side. I'm thinking a buttonhole in the center of 1 strap and the button centered on the other.
B) Work a strip up from each side and make a buttonhole on each to connect to the bag or buttonholes n 3 and conect the button to the fourth.
If you haven't yet, measure your base. I measured across both ways between the unused loops at the edges of the base. (I alo double checked that by measuring around the inside top of the basket. The length twice plus the width twice equaled the perimeter of the bag.)
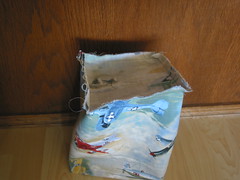
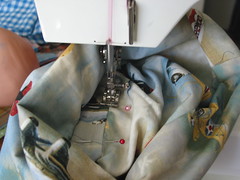
Now to cut fabric! Press seams as you sew for the best looking finished bag.
Cut 2 squares or rectangles equal to bottom measurements of crocheted basket plus 1 inch.
Cut fabric perimeter of crocheted basket by:
twice as tall as you want the bag plus 1 inch for a self lining bag.
cut 2 pieces of fabric the height desired for finished bag plus an inch for a lined bag. (Sew the upper edge of the lining to the upper edge of the outer fabric Right Sides Together, then continue)
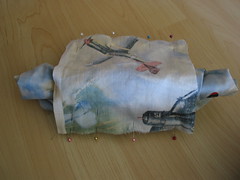
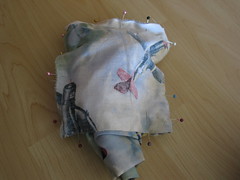
Fold fabric in half width wise (so the side edges touch) and sew a 1/2 inch seam, leaving first and last 1/2 inch unsewn.
Fold bag in half the other way (so the top and bottom edges touch -these will both be bottom edges from here out)
Stay tuned for next installment!
I saw this idea on twelve 22 and thought it was nice. Personally, a more square or rectangular bag would be more useful -possibly fit more items inside, certainly take less shelf space side-to-side. As a homeschooler, these lunch bags would be wonderful for our field trips!
Materials:
yarn and hook or needles (I used Aunt Lydia's Denim and a G hook for a dense material)
measuring tape
fabric
sewing machine or needles (this is pretty quick to sew) and thread
large button
My version is crocheted, but a knit version would be easy to make.
Note: this is written in American crochet.
Crochet in multiple of 8+1 to desired length.. (I worked 25ch)
turn, sc in second ch from hook and each across, ch1 turn.
*sc in each sc, ch 1 turn. Repeat from * until 2 less than a multiple of 8. (22 rows on my bag)
sc across, do not turn.
First Round:
sc in edge st of each row,
sc across bottom of beginning ch,
sc in each st of remaining edge.
sc across top of sc to beginning of round, join with sl st, ch 1.
(this will put 2 sts in the corner sts, because there is one from the 'edge' and one from the loops at top or bottom which gave me 24 st on each side..). You should end up with (or fiddle slightly as you stitch) a multiple of 8 on each edge (mine had 24 per side, 96 sts total)
You can measure the size of the base now (if your tape measure is handy) or when you've finished the basket.
In back loops only (this round only): hdc in each st around, join w/sl st, ch1.
Basketweave pattern:
first 2 rounds of pattern: (fpdc around next 4 sts, bpdc around next 4 sts) around, join w/sl st, ch1.
next 2 rows of pattern: ( bpdc around next 4 sts, fpdc around next 4 sts) around, join w/sl st, ch1.
Repeat all 4 rows of basketweave pattern to desired height (I repeated twice).
Final Round (work in both loops except center 4 sts on each side, )
Crab st in last 10 sts of previous round. *Crab st in Front Loop Only next 4 sts, crab sts in next 20 sts. Repeat from * twice, Crab st in remaining 10 sts. Fasten off, weave in ends.
How tall do you want the lunchbag? Measure how tall the side of the basket is at this point. The last crochet part is to make handles from the unused loops on the last round. The 2 options are:
A) Work the strips long enough to go over the top of the bag and connect on the opposite or adjoining side. I'm thinking a buttonhole in the center of 1 strap and the button centered on the other.
B) Work a strip up from each side and make a buttonhole on each to connect to the bag or buttonholes n 3 and conect the button to the fourth.
If you haven't yet, measure your base. I measured across both ways between the unused loops at the edges of the base. (I alo double checked that by measuring around the inside top of the basket. The length twice plus the width twice equaled the perimeter of the bag.)
Now to cut fabric! Press seams as you sew for the best looking finished bag.
Cut 2 squares or rectangles equal to bottom measurements of crocheted basket plus 1 inch.
Cut fabric perimeter of crocheted basket by:
twice as tall as you want the bag plus 1 inch for a self lining bag.
cut 2 pieces of fabric the height desired for finished bag plus an inch for a lined bag. (Sew the upper edge of the lining to the upper edge of the outer fabric Right Sides Together, then continue)
Fold fabric in half width wise (so the side edges touch) and sew a 1/2 inch seam, leaving first and last 1/2 inch unsewn.
Fold bag in half the other way (so the top and bottom edges touch -these will both be bottom edges from here out)
Stay tuned for next installment!
Labels: Knit
posted by jennifer. at
6:44 AM
![]()

0 Comments:
Post a Comment
<< Home